top of page
Powerful Features
for Modern Pet Care

Mobile friendly
Access everything on-the-go with a seamless mobile experience

Dashboard at a glance
See bookings, revenue, and key updates in one quick view
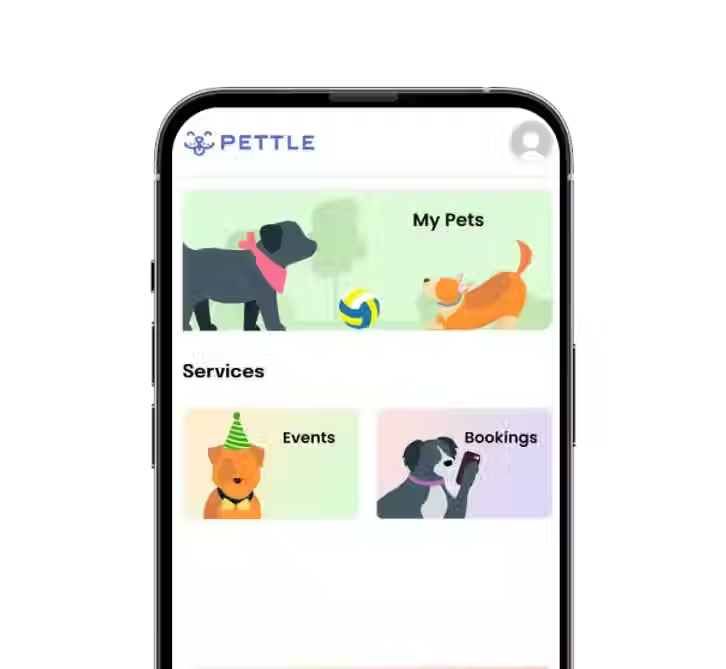
Pet parent app
Give pet owners control via a mobile app — they can book services, view grooming history, and stay updated.

Structured Client Databases
Keep pet and pet parent records organised and easily accessible

Smoooth client journey
From onboarding to bookings to communication—offer great customer experience at every step

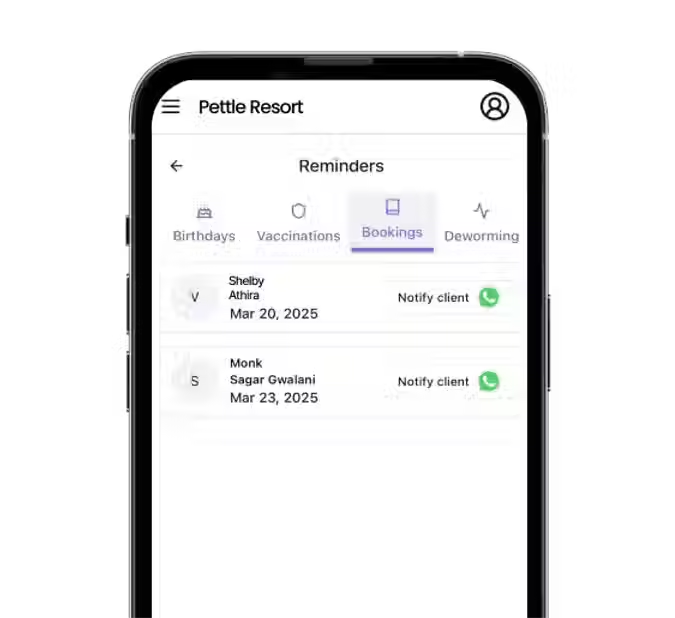
Automatic reminders
Always stay 2 steps ahead with automated vaccination, booking, and product reminders
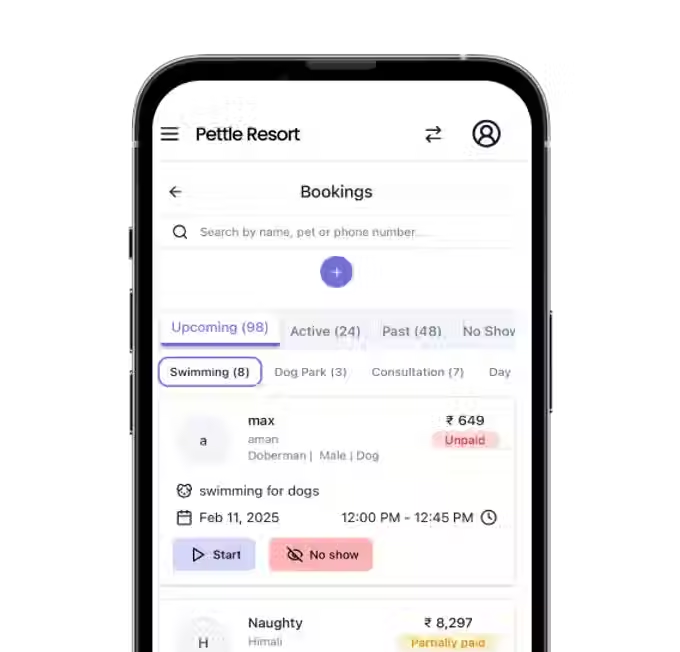
Appointment booking
Make booking appointments simple for both you and your clients

Automatic Invoicing
Set flexible prices and offer automatic discounts based on rules you choose
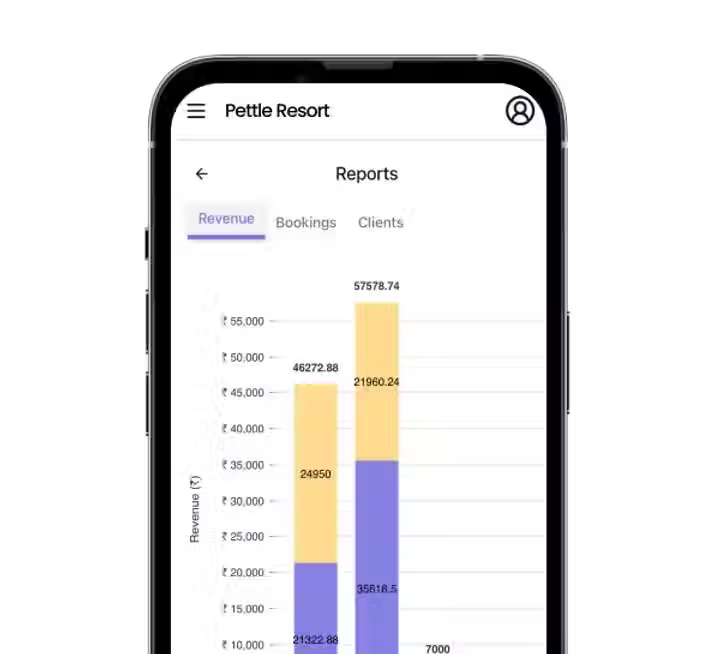
Powerful Reporting
Get crystal-clear insights on revenue, bookings, occupancy rates and at individual and client-levels

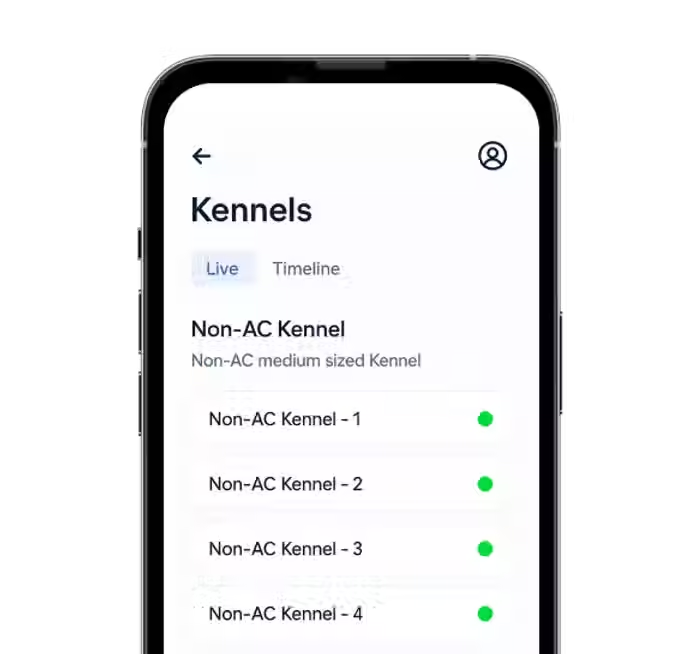
Kennel Management
Effortlessly track, assign, and optimise kennel and room inventory.

Automated Daily task lists
Stay on top of daily operations with auto-generated task lists
Access Management
Control user permissions and secure sensitive data with flexible access management features.
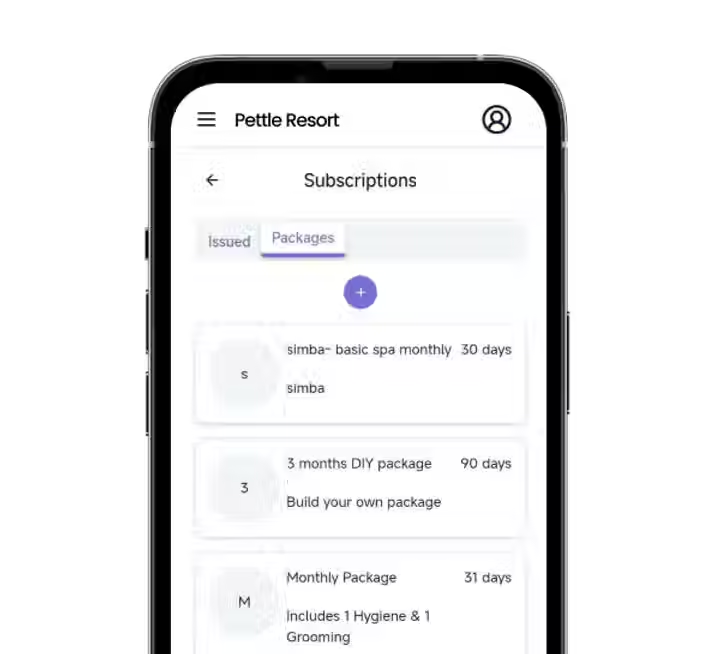
Subscription Management
Increase customer retention and repeat revenue with smart, trackable subscriptions & packages

Expense Management
Monitor and control business expenses in real time
Integrations
Connect for seamless operations
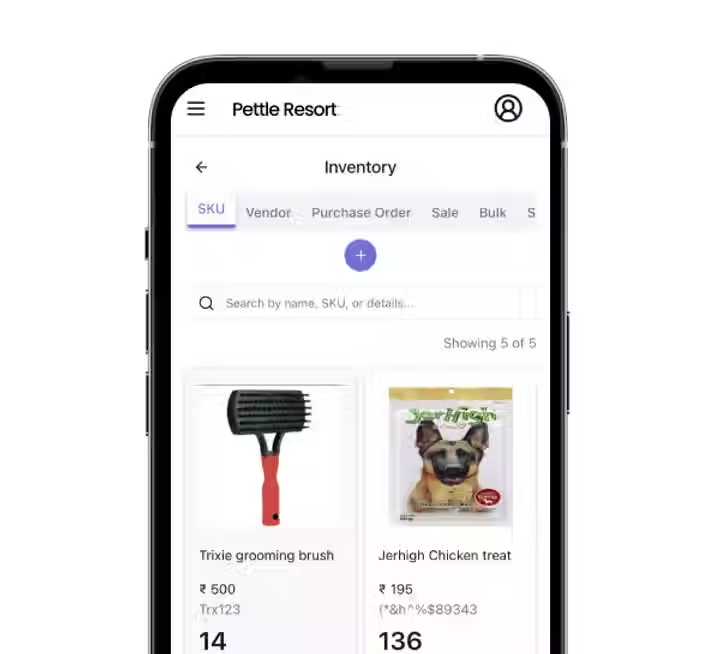
Inventory Management
Effortlessly track & handle any retail sales
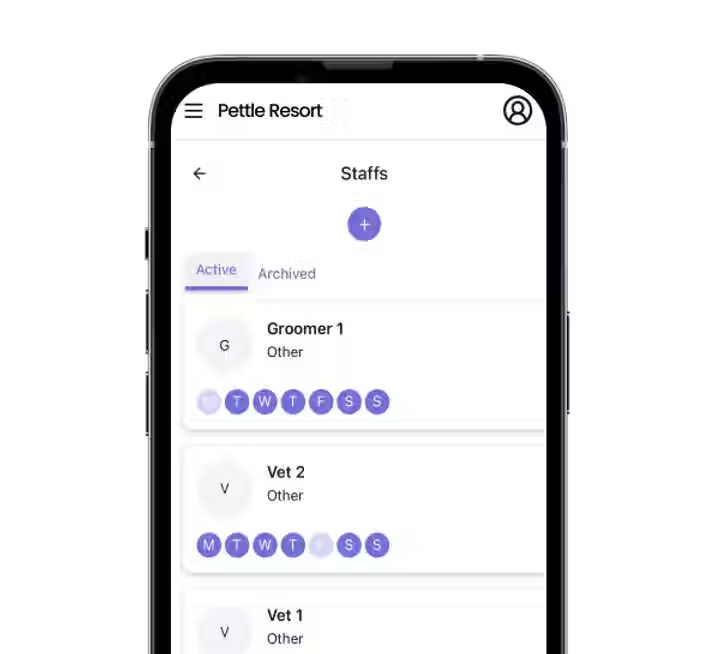
Staff Management
Manage staff schedules, leaves and more
-
Can I upgrade my current plan?Yes! You can upgrade your plan anytime based on your business needs. 📌 We offer Monthly, Quarterly, Bi-Annual, and Annual plans to suit different requirements. For pricing you can check out our website. 🚀 Contact your Pettle POC, and they will assist you with the upgrade.
-
If I require assistance, whom do I reach out to?You can always reach out to your Pettle POC for support. 📅 Support Availability: ✅ Monday to Friday: 10 AM - 7 PM ✅ Weekends: Available for emergencies We're here to assist you whenever you need help! 🚀
-
I recently added more staff to my team. Is training possible?Yes! We are happy to help with training sessions to ensure your team is comfortable using Pettle. 📌 Reach out to your Pettle POC to schedule a training session tailored to your team's needs. 🚀
-
I want to cancel my subscription with Pettle. How can I do that?We’re sorry to see you go! To cancel your subscription, please reach out to your Pettle POC, and we will assist you with the process. 📌 If there’s anything we can do to improve your experience, we’d love to hear your feedback! 🚀
-
Does Pettle have a referral program?Yes! We have a referral program that rewards you for bringing new businesses to Pettle. 📌 Contact your Pettle POC for more details on how to participate and earn rewards! 🚀
-
How safe is my data?Your data is secure with Pettle. We have an MOU (Memorandum of Understanding) in place to ensure data protection and confidentiality. 📌 For more details or official documents, please reach out to your Pettle POC. 🚀
-
Does this work on Mobile?Yes, Pettle is cloud-based, which means you can access it seamlessly across all your devices. Whether you're on your desktop, tablet, or mobile phone, you can work simultaneously without any interruptions.
-
How do I set the pet behaviour list?Setting up the pet behaviour list helps you understand an incoming pet’s temperament, making it easier to provide the right care. Pettle offers a list of 50+ behaviours across dogs and cats, and you can choose which ones to include in your onboarding form. Steps to Set Up the Pet Behaviour List: 1️⃣ Go to My Business 2️⃣ Navigate to Business Settings 3️⃣ Click on General Settings 4️⃣ Check or uncheck the behaviours you want to include This allows you to tailor the form based on your business needs, ensuring you collect only relevant behavioural details from pet parents. 🐾
-
What is the 24-hour billing cycle in boarding bookings, and how are late checkout fees calculated?🕒 The 24-hour billing cycle helps you charge fairly based on the pet’s check-in and check-out times. 💡 Here’s how it works: If a pet checks out after 24 hours from the check-in time, late checkout fees will be automatically applied based on your defined slabs. 📊 Example Fee Slabs: ⏱️ Up to 60 minutes late → ₹100 extra ⏱️ More than 60 minutes and up to 240 minutes → ₹1000 extra ⏱️ Beyond 240 minutes → Additional charges as per your setup
-
How do I set up my boarding categories like daycare/overnight?To set up your boarding categories, follow these steps: 1️⃣ Go to My Business > Business. 2️⃣ Click on the Boarding tab. 3️⃣ Select the boarding type your business supports (e.g., Daycare, Overnight). 4️⃣ Add the Check-in/Check-out slots as needed. This ensures a well-structured boarding setup for your services! 🚀
-
Can I set a different behaviour list for dogs, cats, or other pets?Yes, you can! To set specific behaviour lists for different types of pets, follow these steps: Go to My Business. Navigate to Business Settings. Click on General Settings. Check or uncheck the behaviours you want to include in the onboarding form for each pet type (dogs, cats, or others).
-
Can I add any additional pet behaviours?Yes, you can! Simply share the list of additional pet behaviours with your Pettle Point of Contact (POC), and we’ll ensure it gets updated for you. This helps you tailor the platform to your specific requirements.
-
What is "My Business"?"My Business" is the central console of your entire operation on Pettle. It’s a one-time setup feature that allows you to: Configure your business details and personalize them to fit your needs. Set up your service catalogue and define your pricing structure. Manage your staff members, their roles, and responsibilities. Handle payments and keep track of financial transactions. Oversee your communications with clients, ensuring everything runs smoothly. With "My Business," you can streamline every aspect of your business and ensure it operates seamlessly on Pettle, saving you time and effort.
-
I don’t require all the vaccinations you’ve mentioned. Can I remove or add certain vaccinations from the list?Yes, you can! To modify the vaccination list for your onboarding form, follow these steps: Go to My Business. Navigate to Business Settings. Click on General Settings. Check or uncheck the vaccinations you want to add or remove from the onboarding form.
-
How do I enable late checkout fees for boarding bookings?🛠️ To enable this feature: Go to My Business > Business > Boarding Enable the toggle for 24-hour booking billing cycle Click on + Add Fee Slabs to set your charges 📌 Example: Minutes: 60 → Amount: ₹100 Minutes: 240 → Amount: ₹1000 📦 The system will auto-apply these charges during checkout based on how late the pet checks out.
-
Can I add more vaccinations beyond the list provided?We’ve included a comprehensive list of vaccinations based on the best available information. However, if you need to add additional vaccinations, simply provide the list to your Pettle Point of Contact (POC), and we’ll ensure it gets updated for you.
-
Can I change the name of the breed sizes?Yes, you can! For example, if you prefer to rename the default breed size categories "Small," "Medium," and "Large" to something more specific, like "Small (1-10 kg)," "Medium (10-25 kg)," and "Large (25-40 kg)," here’s how you can do it: Go to My Business. Navigate to Business Settings. Click on Pet Info. Click on the edit icon next to the breed size and rename it according to your business needs.
-
Can I show late checkout fees separately on the invoice?Yes! ✅ When you enable this setting, late checkout fees will appear as a separate line item on the invoice 🧾 instead of being clubbed under the boarding service charge. This makes billing clearer and more transparent for your clients ✨. To enable this: Go to My Business > Boarding and turn on the toggle for “Display late checkout fees as separate charges” ⚙️.
-
Where can I set my company logo?You can set your company logo by following these steps: Go to My Business. Navigate to Company Settings. Upload your app banner (recommended aspect ratio: 1:1, a square image)
-
How do I set up the pets that I cater to?To set up the types of pets you cater to, follow these steps: Go to My Business. Click on Business Settings. Navigate to Pet Info and select from the list of options. For example, select only ‘Dogs’ if you only service dogs. Select ‘Dogs’ and ‘Cats’ if you also service cats.
-
How can I modify the coat size?Yes, you can modify the coat size by following these steps: 1️⃣ Go to My Business > Business. 2️⃣ Click on Pet Info. 3️⃣ Click on the edit icon next to Coat. 4️⃣ Rename it as per your business requirements. This allows you to customise coat size categories to suit your needs! 🚀
-
Can I automate discounts for my Boarding services?Yes, you can automate discounts for your Boarding services using the following factors: Longevity: Apply discounts based on the duration of the booking. Breed: Offer discounts based on the breed of the pet. Parent Supplied Meal: Provide discounts if the pet’s parent supplies their meal. Breed Size: Offer discounts based on the pet's breed size (Small, Medium, Large). Spayed/Neutered: Apply discounts for spayed/neutered pets. Adoption Status: Offer discounts for adopted pets. Multi-Pet Boarding: Provide discounts for clients with multiple pets. Kennel Category: Apply discounts based on the type of kennel selected (AC, non-AC, Small Crate, etc.). Client Tag: Apply discounts based on custom client tags (e.g., VIP, Regular, Big Spender). Each of these factors can be set to adjust the pricing automatically.
-
What are the different types of pricing factors?Pettle allows you to customise pricing based on various factors to suit your business needs. Some key pricing factors include: Breed Size & Coat – Charge differently based on the pet's size (Small, Medium, Large) or coat type (Short, Long, Double Coat). Breed Type – Set different rates for specific breeds that may require extra care or time. These factors help you create a flexible and transparent pricing structure for your services.
-
Why do I need to add duration for my Grooming services?Setting a duration for your grooming services ensures smooth scheduling by: Avoiding double bookings – This helps in efficient time management so that each pet gets the dedicated attention it needs. Blocking the groomer’s calendar – Once a booking is made, the system reserves that time slot, preventing overlapping appointments. Better staff planning – Knowing the time required for each service allows you to plan staff availability and optimise their workload. This small step helps maintain an organised schedule, improves service quality, and ensures a hassle-free booking experience for both you and your clients. ✂️🐶
-
How can I set up my service catalogue?Setting up your service catalogue is a one-time process that connects your catalogue to your invoices for seamless service management. This ensures your services are well-organized, priced accurately, and integrated with your invoicing system. However, the process for updating the service catalogue differs for each type of service you offer. In this FAQ, we will explain the specific process for updating the catalogue for each service, making it easier for you to manage and customize your offerings.
-
How can I archive a service category or control its visibility (public/private)?📂 You can now archive or make a whole service category public or private easily! 🔧 Here’s how: Go to My Business > Service Catalogue Select the category (Boarding/Training/Resort) Click the ⚙️ Settings icon Choose: Visibility → Public 👁️ / Private 🙈 Status → Active ✅ / Archive 🗄️
-
I have a different flat pricing based on the age of the pet. Can I create different prices for puppies/kittens and adults?Yes, you can! To create different prices for puppies/kittens and adults, follow these steps: Go to My Business > Service Catalog. Click on Boarding and click the + sign to add a new service. In the Top-Level Catalogue Details section: For puppies/kittens, set the Max Age to 6-8 months. For adults, set the Min Age to 6 or 8 months. This allows you to create separate pricing for puppies/kittens and adult pets based on their age group.
-
How can I set up my Boarding service in the service catalogue?Setting up your Boarding service pricing is a one-time effort. Here’s how to do it: Go to My Business > Service Catalogue. Click on Boarding. Click on the + sign to add a new service. Fill in the details as mentioned below: Step 1: Configure the Catalogue Catalogue Name Pet Type (Select either Dog, Cat, or Other if you have different pricing for each pet type) Boarding Type (Choose either Day, Night, or Overnight if you have different pricing for each) Age Range in months Min Age Max Age Step 2: Configure the Relevant Variable Pricing Structures You can select and configure all factors that affect your pricing, either for increases or discounts: Longevity: Discounts based on stay duration (e.g., 10% off for stays longer than 7 days). Breed: Pricing variations based on breed type (e.g., higher rates for high-maintenance breeds like Huskies). Parent Supplied Meal: Discount if pet parents provide food (e.g., ₹50 off per day if meals are supplied). Breed Size: Charges based on pet size (e.g., Large dogs may have higher boarding fees than Small dogs). Spayed/Neutered: Special pricing for spayed/neutered pets (e.g., ₹100 off for neutered pets). Adoption Status: Discounts for adopted pets (e.g., 5% off for pets adopted from a shelter). Multi Pet Boarding: Special pricing for multiple pets from the same family (e.g., ₹200 off for the second pet). Kennel Category: Different rates based on kennel type (e.g., AC kennel costs more than non-AC kennel). Client Tag: Custom pricing based on client category (e.g., VIP clients get priority booking and special rates). Once set up, this pricing structure will automatically be linked to your invoices, ensuring smooth and consistent billing for your Boarding services.
-
Can I add different time slots for the same service (morning/evening)?Yes, you can! You need to create separate catalogues with different start and end times to offer multiple time slots (e.g., morning and evening) for the same service. Steps to Add Different Time Slots: 1️⃣ Go to My Business > Service Catalogue. 2️⃣ Select the service type (e.g., Grooming, Resort Service, etc.). 3️⃣ Click on the "+" sign to add a new catalogue. 4️⃣ Enter the service name (e.g., “Morning Swimming” or “Evening Grooming”). 5️⃣ Set the Start Time and End Time based on the time slot. 6️⃣ Save the catalogue. 🔹 Tip: This helps in better scheduling and ensures no overlapping bookings. 🚀
-
What is a Resort Service on the Pettle app?Resort services include any offerings beyond boarding, grooming, and boarding & training. These are fun, engaging activities designed to enhance a pet’s experience at your facility. Examples: 🐾 Swimming sessions 🐾 Dog park access 🐾 Socialising events 🐾 Agility training 🐾 Spa treatments These services add value for pet parents looking for recreational and enrichment activities for their pets.
-
How do I assign my staff to a Resort Service?You can assign staff while creating the service. There are two options: Daily Slots and Daily Slots with Staff. Steps to Assign Staff: 1️⃣ Go to My Business > Service Catalogue > Resort Services (e.g., Swimming, Dog Park, etc.). 2️⃣ Click on the "+" sign to add a new service. 3️⃣ Enter the service name and description. 4️⃣ Select the type of service (Daily Slots or Daily Slots with Staff). 5️⃣ If choosing Daily Slots with Staff, assign the staff member during setup. This ensures proper scheduling and avoids double bookings. 🚀
-
How do I create a catalogue for Board and Train?Follow these simple steps to set up your Board and Train catalogue: 1️⃣ Go to My Business > Service Catalogue > Board and Train. 2️⃣ Click on the "+" sign to create a new catalogue. 3️⃣ Fill in the basic details, such as: Duration (how long the training program lasts). Amount (whether the pricing is for the entire package or per stay). 4️⃣ Assign the staff responsible for training. 5️⃣ Click on Create, and your catalogue is ready! This helps streamline your training services and ensures easy booking management. 🚀
-
How can I make an individual service public or private?🎯 Currently available only for Resort services, you can manage each service's visibility: 📍 Steps: Go to My Business > Service Catalogue Select the individual Resort Service Click on Edit Under Visibility, choose: Public = Visible to customers 👀 Private = Hidden from customers 🙈
-
How do I enable Inventory Expiry Reminders?⚙️ To enable: Go to Reminders > Settings Turn on the toggle for Inventory Expiry Reminder Set how many days before expiry you want the alert 🛡️ This helps you use products on time and reduce losses.
-
How do I send reminders to my clients?It’s easy! Go to the "Reminders" tab and click on the "Notify Client" or WhatsApp icon to send a reminder instantly.
-
What are Inventory Expiry Reminders and how do they work?🧴 Inventory Expiry Reminders help you avoid waste by notifying you when a product batch is nearing expiry. 📋 How it works: You’ll get a reminder a set number of days before the expiry date You choose how early you want to be notified 📌 Example: If a batch expires on the 20th and you set a 7-day reminder, you'll get alerted on the 13th 📆
-
What are Reorder Reminders and how do they work?🔁 Reorder Reminders help you stay stocked by alerting you before you need to reorder an item. 📋 How it works: You can set a reminder for each SKU Choose how many days in advance you want the reminder Get notified before stock runs low! 📌 Example: If the reorder date is 30th and you set a reminder for 5 days, you'll be alerted on the 25th 🗓️
-
Can I edit the frequency of the reminders?Yes, you can customize the frequency for reminders like deworming and repeat bookings. Here’s how: Go to the "Reminders" tab. Click on the settings icon. Enter the desired number of days before the event when you’d like the reminder to be sent. For example, if deworming is due on January 15th and you want to remind your client 5 days in advance, simply set the reminder to 5 days.
-
Can I get automated Vaccination and Deworming reminders?Absolutely! Pettle helps you stay on top of important reminders for Vaccinations, Deworming, and other events. 🔹 Manual Reminders (Included in Core Plan): Pettle shows upcoming reminders in your dashboard, allowing you to manually send them via WhatsApp using our basic WhatsApp integration. 🔹 Automated Reminders (Add-on Feature): For fully automated reminders, you can opt for our WhatsApp Meta Integration. Once enabled, this feature will automatically send reminders to clients on WhatsApp, ensuring they never miss an important update—saving you time and effort. With both options available, you can choose what works best for your business! 🚀
-
How do I enable Reorder Reminders?⚙️ To turn it on: Go to Reminders > Settings Enable the toggle for Reorder Reminder Set the number of days before the reorder date 📬 You'll get timely alerts to restock before items run out!
-
What notifications do I receive?Pettle keeps you updated with essential notifications such as: Pet birthdays Vaccination due dates Deworming reminders Repeat bookings
-
Are the notes shared with the clients?No, notes are for internal use only and are never visible to clients. You can use them to document important details about a pet, client preferences, or any other internal information to help manage bookings efficiently.
-
How do I manage payments for bookings?To manage payments for a booking, follow these steps: 1️⃣ Go to Booking Records. 2️⃣ Select the particular booking for which you want to add a payment. 3️⃣ Click on the Payments tab. 4️⃣ Click on the "+" sign to add a new payment. 5️⃣ Enter the payment details (amount, mode of payment, etc.). 6️⃣ Click Save, and the payment will be recorded. This helps you keep track of payments and outstanding balances for each booking. 🚀
-
What are Upcoming, Active, Past, and No Show bookings?Pettle categorises bookings into different statuses to help you track them easily: ✅ Upcoming Bookings – These are confirmed future bookings that are scheduled but haven't started yet. ✅ Active Bookings – These are ongoing bookings where the pet is currently checked in for a service (e.g., Boarding, Grooming, Consultation,Training). ✅ Past Bookings – These are completed bookings where the service has been successfully provided, and the pet has checked out. ✅ No Show Bookings – These are missed appointments where the client did not show up, and no check-in was recorded.
-
How do I make a multi-pet booking?To book multiple pets under the same client, follow these steps: 1️⃣ Go to Booking Records. 2️⃣ Search and select the client from your existing client database. 3️⃣ Click on the "+" sign to create a new booking. 4️⃣ Select the service type (e.g., Boarding, Grooming, Resort Services). 5️⃣ Each pet that is registered with this client will show up. For the relevant pets, fill in the service details. (e.g., Check-in & Check-out dates for Boarding, Grooming preferences, etc.). 6️⃣ Click Next to review the invoice summary. 7️⃣ Click Submit to confirm the booking. This ensures that all pets under the same pet parent are booked together in a single, seamless process. 🚀
-
How can I add a booking for a pet parent?To add a booking for a pet parent, follow these steps: 1️⃣ Go to Booking Records. 2️⃣ Search and select the client from your existing client database. 3️⃣ Click on the "+" sign to create a new booking. 4️⃣ Select the service type (e.g., Boarding, Grooming, Vet consult, Other Services). 5️⃣ Fill in the required details based on the selected service: For Boarding: Add Check-in & Check-out date/time, Boarding type, Kennel selection, and Meal preferences (if applicable). For Grooming: Select the grooming package, groomer preference, and appointment time. For Resort Services (e.g., Swimming, Dog Park): Choose the service, time slot, and staff assignment (if applicable). 6️⃣ Click Add Booking, and the appointment will be scheduled. 🚀
-
How do I add an add-on service to an existing booking?To add an add-on service to an existing booking, follow these steps: 1️⃣ Go to Booking Records. 2️⃣ Select the particular booking you want to update. 3️⃣ Click on the Add-on tab. 4️⃣ Click on the "+" sign to add a new add-on service. 5️⃣ Select the add-on service and enter the quantity if applicable. 6️⃣ If needed, edit the count of the add-on service before confirming. 7️⃣ Click Add, and the service will be directly added to the invoice.
-
How can my pet parent make a booking or send a booking request?Pet parents who are already registered in your client database can easily send a booking request through the Pettle Pet Parent App. ✅ They can also view past bookings, manage payments, and track upcoming appointments directly from the app. 🔗 Download the app here: Pettle Pet Parent App 🚀
-
Can I add multiple services in one booking, and will this generate one invoice?Steps to Add Multiple Services in One Booking: 1️⃣ Go to Booking Records. 2️⃣ Select the client’s booking or create a new one. 3️⃣ Click on "+" Add Services in the info tab. 4️⃣ Select and add multiple services (e.g., Boarding, Grooming, Training, Consult). 5️⃣ All selected services will be included in one invoice for easy billing. This ensures a seamless booking experience for both you and the pet parent. 🚀
-
What does the check-in form contain?The check-in form ensures all essential details are recorded before confirming the pet’s stay. Here’s what it includes: Step 1: Confirmation Prompt 🔹 A prompt appears: "Are you sure you want to CHECK-IN?" 🔹 If the check-in date differs from the scheduled date, a warning pops up:"Today is not the check-in date. If this is an error, please modify the booking dates before proceeding." Click "Modify the Booking" to correct the date before proceeding. Step 2: Upload Pet & Accessory Pictures 🔹 Upload Pet Photos – Helps maintain records of the pet’s condition at check-in. 🔹 Upload Accessories Photos – Ensures that any pet belongings (collars, beds, toys) are documented. Step 3: Enter Pet Details 🔹 Enter the Pet's Weight (in KGs) – Useful for tracking changes during the stay. 🔹 Modify Check-In Time – Adjust the check-in time if needed. 🔹 Additional Notes – Add any special instructions or observations for a smooth check-in. Step 4: Companion Contact Details 🔹 Local Companion Name & Contact Details – Emergency reference in case the primary pet parent is unavailable. 🔹 Internal Notes – Notes visible only to you, not shared with the pet parent. Step 5: Final Check-In 🔹 Click "Check-In" to complete the process. The pet is now officially checked in, and the booking status updates accordingly. 🚀
-
How do I check in a pet?To check in a pet for their booking, follow these steps: 1️⃣ Go to Booking Records. 2️⃣ Search for the client. 3️⃣ Navigate to Upcoming > Boarding. 4️⃣ Click on Check-In to confirm their arrival. Once checked in,a short check-in form will pop up. Not all details on the check-in form are mandatory, but they can aid a smooth check-in process.
-
How do I edit dates for boarding if a pet is overstaying or checking out early?To modify the check-in or check-out dates for a boarding booking: 1️⃣ Go to Booking Records. 2️⃣ Navigate to Upcoming/Active Bookings. 3️⃣ Select the client’s booking. 4️⃣ Click on the three dots (⋮) beside the eye icon. 5️⃣ Modify the Check-in or Check-out timings as needed. 6️⃣ Click Update to save the changes. This ensures that the booking reflects the actual stay duration. 🚀
-
How do I start and end a grooming session?To Start the Grooming Session: 1️⃣ Go to Booking Records > Upcoming Bookings > Grooming. 2️⃣ Search for the client. 3️⃣ Click on Start to begin the session. 4️⃣ Complete the required steps (Consent form, Advance Payment details, Pet photographs). To End the Grooming Session: 1️⃣ Go to Booking Records > Active Bookings > Grooming. 2️⃣ Select the client’s grooming session. 3️⃣ Click on End and fill in the required details. 4️⃣ Upload after photos (if needed) and finalize the session. This ensures a structured workflow from start to finish. 🚀
-
How can I modify the duration of the grooming session?If a grooming session takes more or less time than expected, you can adjust the end timing before closing the session. Steps to Modify Grooming Duration: 1️⃣ Click on End Booking when the session is complete. 2️⃣ Modify the End Time as needed. 3️⃣ Save the changes to update the session duration. This ensures accurate time tracking for each grooming appointment. 🚀
-
Can I set repeat booking reminders for grooming?Yes! For a lot of your clients, you will be requesting them to make a future appointment at the time of check-out. You can easily track this on Pettle. You can set a repeat booking reminder while ending the grooming session. Steps to Set a Repeat Booking Reminder: 1️⃣ Click on End Booking after completing the grooming session. 2️⃣ Enable the Reminder Toggle to activate the repeat booking reminder. 3️⃣ Select and edit the Repeat Booking Date as per the client’s preference. 4️⃣ Click End, and the client will receive a reminder for their next appointment. This helps ensure regular bookings and improved client retention. 🚀
-
How do I edit Grooming booking details?You can modify the date, slot timings, assigned groomer, or services for a grooming booking. Steps to Edit Grooming Booking Details: 1️⃣ Go to Booking Records. 2️⃣ Navigate to Upcoming Bookings. 3️⃣ Select the Grooming Booking you want to edit. 4️⃣ Click on the three dots (⋮) on the Grooming tab. 5️⃣ Make the necessary changes (date, time, groomer, or services). 6️⃣ Click Update to save the changes. This ensures the appointment details are accurate and up to date. 🚀
-
How can I send this reminder to the client?To send a reminder to the client, follow these steps: 1️⃣ Go to the Reminders tab > Select Bookings. 2️⃣ You will be able to see a list of clients for whom you have set reminders for repeat booking. Click on Notify Client and choose WhatsApp to send the reminder instantly. This ensures timely communication and a seamless client experience. 🚀
-
Can I add before/after photos of the pet?Yes! You can upload before photos when starting the grooming service and after photos when completing it. 📸 Before Photos – Add at the start of the grooming session. 📸 After Photos – Upload at the end of the session before marking it as complete. This helps maintain records and showcase grooming transformations. 🚀
-
How do I change the dates/time for my resort service?You can modify the date and slot timing for any resort service booking. Steps to Edit Resort Service Booking: 1️⃣ Go to Booking Records > Active/Upcoming Bookings. 2️⃣ Select the Resort Service (e.g., Swimming, Dog Park). 3️⃣ Choose the specific booking. 4️⃣ Click on the three dots (⋮) and select Edit. 5️⃣ Modify the date and slot timing as needed. 6️⃣ Click Update to save the changes. This ensures the booking reflects the correct schedule. 🚀
-
The dog is going home for a couple of days. How do I add a break between an ongoing Board and Train booking?You can add a break in the Board and Train booking if the pet is temporarily going home. Steps to Add a Break: 1️⃣ Go to Booking Records. 2️⃣ Select the Board and Train booking. 3️⃣ Choose the specific session and click on View. 4️⃣ Navigate to the Breaks section. 5️⃣ Click on the "+" sign to add a break. 6️⃣ Enter the break duration and details. This ensures accurate tracking of the training schedule. 🚀
-
How do I add notes for every session in my Board and Train booking?You can add notes for each training session to track progress and important details. Steps to Add Notes for a Board and Train Session: 1️⃣ Go to Booking Records. 2️⃣ Select the Board and Train booking. 3️⃣ Choose the specific session and click on View. 4️⃣ Navigate to the Notes section. 5️⃣ Click on the "+" sign to add notes. 6️⃣ Enter the details and save. This helps maintain a structured record of each training session. 🚀
-
How do I set up my staff’s working hours and days?You can manage staff schedules through Staff Management: 1️⃣ Go to My Business > Staff. 2️⃣ Select the staff member whose schedule you want to update. 3️⃣ Click on the three dots in the top-right corner and select Edit Staff. 4️⃣ Update the working hours and working days as needed. 5️⃣ Click Update to save the changes.
-
How do I archive a staff?To archive a staff member: 1️⃣ Go to My Business > Staff 2️⃣ Select the staff member you want to archive 3️⃣ Click on the three dots (options menu) 4️⃣ Select Move to Archive 5️⃣ Confirm by selecting Yes The staff member will be archived and won't show in the active list, but their details will remain accessible for reference.
-
How do I add a staff member?It's simple to add a staff member to your system: 1️⃣ Go to My Business > Staff 2️⃣ Click on the + sign 3️⃣ Fill in the basic details such as name, contact number, shift timings, working days, etc. 4️⃣ Click Create Your staff member is now added to the system and ready to be assigned to tasks!
-
How do I assign staff to my Grooming Catalogue?There are two ways to assign a groomer to your grooming catalogue: While Creating the Grooming Catalogue – Assign the groomer directly when setting up the catalogue. Through Staff Management – Go to My Business > Staff, select the staff member, navigate to Catalogues, and assign the relevant grooming services. This ensures the right staff is linked to the right services for smooth operations. 🚀
-
How do I manage the leaves of my staff?You can easily manage staff leaves with these steps: 1️⃣ Go to My Business > Staff 2️⃣ Select the staff member you wish to manage 3️⃣ Go to Leaves 4️⃣ Click on the + sign 5️⃣ Select the leave type and dates 6️⃣ Click Mark Leave Your staff's leave will now be updated in the system!
-
How do I add more questions to the Onboarding form?We’ve already included all the essential questions in the Onboarding form. However, if you’d like to add custom questions, please reach out to your Pettle POC, and we’ll assist you in making the necessary updates. 🚀
-
How can I add Terms & Conditions?To add your Terms & Conditions, follow these steps: Go to My Business. Navigate to Forms. Click on the edit button on the right. Add your Terms & Conditions in the provided section. Once added, the T&Cs will appear at the end of the onboarding form, and the pet parent will be required to accept them just once during the registration process. This ensures clarity and agreement from your clients!
-
Are the consent form and terms and conditions different?Yes, they are different. Here’s the distinction: Terms & Conditions (T&C): The T&Cs need to be accepted only once during the onboarding process. Once accepted, they cover all future interactions with the client, and there’s no need for them to accept it again unless you update it. Consent Form: The consent form, however, must be accepted for every booking. This ensures that the pet parent gives their consent specifically for each service or booking. It's important to note that the consent form is prompted not just during onboarding but also for every booking made thereafter. Both are optional, but we strongly recommend keeping at least the T&C to set clear expectations and protect your business. 🚀
-
Can I customise the onboarding form?Yes, you can! Most of your onboarding form on Pettle is fully customisable. For every question, you have three options: ✅ Hide – Remove fields you don’t need. ✅ Make Mandatory – Ensure important details are always filled. ✅ Leave Optional – Give flexibility to pet parents. How to customize your onboarding form: 1️⃣ Go to My Business > Forms. 2️⃣ Click on the edit button next to the onboarding form. 3️⃣ Modify each question based on your requirements.
-
How can I add the consent form?To add your consent form, follow these steps: Go to My Business. Navigate to Forms. Click on the edit button on the right. Add your consent form in the provided section. The consent form will be prompted during the onboarding process and needs to be accepted by the pet parent for every booking, ensuring that all necessary permissions are in place.
-
Can I customise the form for different services?Yes, you can! You can customise the onboarding form for each service you offer. Simply: 1️⃣ Go to My Business > Forms. 2️⃣ Click on the edit icon next to the form for the specific service. 3️⃣ Set the questions to be hidden, optional, or mandatory, tailoring the form for each service. This way, you can make sure the form meets the specific needs of each service you provide. 🚀
-
Can I let my pet parents choose the kennel?Yes! You can allow pet parents to select their preferred kennel while booking. To enable this: 1️⃣ Go to My Business > Pet Parent App 2️⃣ Toggle "Enable Kennel Selection for Pet Parents" ON. Once enabled, pet parents can choose from available kennels during booking, giving them more control over their pet’s stay.
-
How can I delete a Kennel category?You can delete a kennel category only if it is not linked to any upcoming, active, or past bookings. If there are existing records, you may need to reassign or complete them before deletion. Follow these steps to delete a kennel category: 1️⃣ Go to My Business > Kennels. 2️⃣ Find the kennel category you want to delete. 3️⃣ Click on the three dots beside the edit icon. 4️⃣ Select "Delete". 5️⃣ Confirm the deletion, and the kennel category will be removed. 🚀 This keeps your kennel management clean and organized! 🏡✨
-
My boarding setup offers multiple categories of kennels, how can I set it up on Pettle?You can easily create different kennel categories by following these steps: 1️⃣ Go to My Business > Kennels. 2️⃣ Click on the "+" sign to add a new category. 3️⃣ Enter the title and description (e.g., AC Kennel, Large Dog Kennel, VIP Suite). 4️⃣ Set the kennel count (how many kennels are available in this category). 5️⃣ Choose a custom colour code for easy identification. 6️⃣ Click on Create, and your kennel category is ready! 🎉 This helps in organising your kennel space efficiently while making it easy to assign pets to the right category. 🐶🏡
-
What is the Kennel tab, and what do the Live and Timeline views show?The Kennel tab helps you manage and track kennel occupancy in real time. It provides two different views to monitor available and occupied kennels efficiently. 🔹 Live View ✅ Displays the current status of all kennels. ✅ Shows which kennels are occupied and which are available. ✅ Lists pet names and assigned kennels in real time. ✅ Useful for quickly checking availability at a glance. 🔹 Timeline View ✅ Provides a date-wise breakdown of kennel occupancy. ✅ Allows you to see past, present, and future bookings. ✅ Helps in planning upcoming stays and managing kennel availability. ✅ Ideal for long-term scheduling and managing peak occupancy periods. These views ensure smooth kennel operations by giving you real-time insights and a structured schedule for bookings. 🚀
-
How do I add more kennels to an existing kennel category?Follow these simple steps to add more kennels to an existing category: 1️⃣ Go to My Business > Kennels. 2️⃣ Select the kennel category where you want to add more kennels. 3️⃣ Click on the three dots beside the edit icon. 4️⃣ Select "Add Kennel". 5️⃣ Give the kennel a name (e.g., Kennel 1, VIP Suite 2, etc.). 6️⃣ Click on Create, and the new kennel will be added to the selected category! 🎉 This ensures smooth kennel management and easy allocation of pets. 🐶🏡
-
How do I archive a Kennel?If a kennel is under construction or maintenance, you can archive it instead of deleting it. This keeps it in your records but makes it unavailable for new bookings. Follow these steps to archive a kennel: 1️⃣ Go to My Business > Kennels. 2️⃣ Select the kennel category that contains the kennel you want to archive. 3️⃣ Click on the eye icon next to the specific kennel. If the eye icon is visible, the kennel is active. If the eye icon is struck out, the kennel is archived. 🔹 You can unarchive a kennel anytime by clicking on the strike-out eye icon to make it active again.
-
How can I customize the WhatsApp communications?Customizing your WhatsApp communications is easy! Here's how: 1️⃣ Go to My Business 2️⃣ Select Communications 3️⃣ Click to customize the desired WhatsApp template 4️⃣ You can add variables by typing "@" (e.g., client name, pet name, invoice link, etc.) This allows you to tailor your messages with dynamic information for a personalized experience!
-
How do I add an invoice link to my WhatsApp messages?You can add an invoice link to the Booking Confirmation and Booking Completion WhatsApp templates. Here’s how: 1️⃣ Go to My Business 2️⃣ Select Communications 3️⃣ Choose the Booking Confirmation or Booking Completion Template 4️⃣ In the message content, insert the invoice link where needed. This will ensure that your clients receive their invoice link directly via WhatsApp, simplifying the payment process.
-
How do I add my invoice details?To add or customise your invoice details, follow these steps: 1️⃣ Go to My Business 2️⃣ Select Invoice Settings 3️⃣ Customize your invoice by inputting details like: Banner Company address Tax settings Footer image Descriptions Taxes This allows you to personalize the invoices to match your branding and include all the necessary business details.
-
My business does not fall into a tax bracket. How can I create my invoices?If your business is not liable for GST, you can still generate invoices by following the same steps as above, but with one key change: 1️⃣ Go to My Business > Invoice Settings. 2️⃣ Toggle OFF the "Are your prices inclusive of taxes?" option. 3️⃣ Skip the tax fields and proceed with adding your services. 4️⃣ Save the settings, and your invoices will be generated without any tax calculations. This ensures that your invoices remain simple and tax-free, aligning with your business needs. 🚀
-
Can I create GST invoices?Yes, you can! To create GST-compliant invoices, follow these simple steps: 1️⃣ Go to My Business. 2️⃣ Select Invoice Settings. 3️⃣ You'll find a question that says "Are your prices inclusive of taxes?" Make sure this is toggled to Yes. 4️⃣ Under Taxes, fill in all the necessary tax details. For example: CGST (Central Goods and Services Tax) SGST (State Goods and Services Tax) IGST (Integrated Goods and Services Tax, applicable for interstate transactions) 5️⃣ Add the services accordingly. For example, if you’re offering a boarding service and grooming, apply the corresponding tax rates: Boarding Service: ₹1000 + 18% CGST (₹180) + 18% SGST (₹180) Grooming Service: ₹500 + 18% CGST (₹90) + 18% SGST (₹90) Once the tax details and services are added, your invoices will be GST-compliant and include all the necessary tax breakdowns! 🚀
-
My business is outside the tax slab. Can I exclude tax from my pricing and invoices?Yes, you can exclude taxes from your pricing and invoices. To do this: 1️⃣ Go to My Business > Invoice Settings. 2️⃣ Turn off the toggle for "Are your catalogue service prices inclusive of taxes?" Once disabled, your invoices will not include tax calculations.
-
How do I update or remove taxes in Pettle?Currently, you can add new tax slabs in Pettle. However, to edit or remove existing tax slabs, please reach out to our support team for assistance.
-
What are the tax types supported in Pettle?Pettle allows you to input tax slabs and percentages manually, meaning you can add any type of tax item as needed. Common tax types include SGST, CGST, IGST, and custom tax structures based on your business requirements.
-
How do I manage my business' tax structures on Pettle?In Tax Settings, Pettle allows you to create a central repository of all your tax slabs (SGST, CGST, IGST, etc.). When adding a service or product to your catalogue, you can simply select the applicable tax item to ensure accurate billing and compliance.
-
How do I add a tax category in Pettle?To add a tax category in Pettle, follow these steps: 1️⃣ Go to My Business > Taxes. 2️⃣ Click on the "+" sign to add a new tax. 3️⃣ Enter the tax name, details, and rate (e.g., SGST, CGST, IGST). 4️⃣ Click Add Tax to save it. Your new tax will now be available for selection while adding services or products.
-
Can I use software to schedule pet grooming appointments online?Of course you can! With a pet grooming software like Pettle, your clients can easily book appointments online 24/7. The software provides instant booking confirmations and allows clients to manage their own appointments through a pet parent app, making scheduling easier for everyone.
-
Is Pettle free to use?Not forever-free, but our plans cost about what you’d charge for a single booking. We know software’s a big decision, so we offer a 15-day free trial. If it’s not a fit, cancel during the trial for a full refund - no questions asked. Our users say Pettle has everything they need, and we think you’ll agree.
-
What software do dog groomers use?Pet groomers typically use specialised pet grooming software to handle their daily tasks and streamline operations. Pettle's All-In-One Pet Grooming Software is a popular choice, offering an intuitive platform designed specifically for the pet grooming industry. It simplifies appointment scheduling, staff management, invoicing, client records, and more. With tools tailored to pet grooming businesses, Pettle helps groomers save time, reduce no-shows, and enhance overall efficiency.
-
Does pet grooming software help with invoicing and payments?Yes, Pettle automates the invoicing process, saving you time and reducing errors. It offers custom pricing options, automatic generation of editable invoices, and integrations with payment gateways like Razorpay, so you can manage payments easily and efficiently.
-
Can a pet grooming software manage multiple groomers or locations?Absolutely! An all-in-one pet grooming software like Pettle’s allows you to manage multiple groomers or locations seamlessly. You can assign staff, track schedules, and manage multiple branches from a central dashboard, ensuring smooth operations across your entire business. Pettle is a web-app that allows you to access it from anywhere at anywhere and on any device. All you need is an active internet connection.
-
Can pet groomers track pet health and grooming history?Yes! With Pettle, you can easily track a pet’s grooming history, health records, and other important details. This ensures a personalised and thorough grooming experience for every pet, supercharging your client’s satisfaction and care.
-
Can I manage digital health records and EMRs securely with this software?Absolutely. With Pettle, your clinic can safely store and access digital health records (EMRs) anytime. It’s fully secure, compliant, and designed to protect your patients’ privacy while keeping everything at your fingertips.
-
Does your platform integrate with other veterinary tools and diagnostics software?Yes! Pettle plays nicely with the tools you already use. From diagnostics to accounting, our veterinary software integrates seamlessly to keep everything connected and flowing smoothly.
-
What is veterinary practice management software, and why do clinics need it?Veterinary practice management software (VPMS or PIMS) is like your clinic’s best assistant! It helps manage scheduling, patient records, billing, and communication all in one place—so your team can work more efficiently and spend more time caring for pets.
-
Does your software offer online appointment booking for pet parents?Yes! Pet parents can easily book appointments online through our intuitive pet parent app or your clinic’s website. It’s quick, convenient, and frees up your front desk team for other important tasks.
-
Does your veterinary software support mobile clinics and on-the-go access?Yes, it does! Pettle’s cloud-based veterinary software is built for mobility—perfect for mobile vets and busy teams who need access to schedules, patient records, and client chats wherever the day takes them.
-
What tools are included to help with inventory and stock management?Pettle’s built-in inventory tools help you stay stocked and stress-free. You can track supplies, set low-stock alerts, and manage retail or medical inventory without the guesswork.
-
Can your veterinary software automate reminders and client communication?Definitely. Pettle sends automatic reminders for vaccinations, appointments, and follow-ups via Whatsapp—keeping pet parents in the loop and boosting care compliance with zero hassle.
-
What happens to my data if I cancel?Your data stays yours. You can export all your client, pet, and booking info if you choose to cancel. For more details, you can refer to our terms of service.
-
Can my team have different logins and permissions?Absolutely. You can set up custom roles for everyone — admins, trainers, kennel techs, front desk — and give them exactly the access they need.
-
Does Pettle work for multi-location businesses?Yes, it does! You can manage multiple locations under one account, with separate staff, calendars, and reports for each one. Perfect if you're growing or already operating in more than one place.
-
Is Pettle cloud-based and mobile-friendly?100%. Pettle is a web app - this means that you can log into Pettle from any browser — desktop, phone, or tablet. No apps to download, and nothing to install. Just log in and get to work.
-
Do my clients get an app too?They do — and they’ll love it. The Pettle Pet Parent App available on App Store & Play Store makes it easy for your clients to book appointments, get updates, and manage their pet’s info. It’s a smoother experience for them, and a lot less back-and-forth for you.
-
Can I use Pettle for home boarding or a cattery?Yes, absolutely! Pettle is flexible enough to be used for home boardings and catteries. Whether you’re running a small home-based boarding service or a larger cattery, Pettle has the tools you need to manage bookings, pet profiles, and client communications with ease.
-
Is Pettle free to use?Not forever-free, but our plans cost about what you’d charge for a single booking. We know software’s a big decision, so we offer a 15-day free trial. If it’s not a fit, cancel during the trial for a full refund - no questions asked. Our users say Pettle has everything they need, and we think you’ll agree.
-
Can I handle payments and invoices with Pettle?You bet. Pettle lets you create invoices, accept payments online, and keep track of billing and transaction history — all from your Pettle account. The best part? It’s auto-generated and you also get dashboards that visualise this for you.
-
Can I bring over data from my old kennel booking software?Yes! In fact, we do something no one else does for you - free data migration. Our team will take care of moving your client and pet records from your old software, spreadsheets, or other tools — so you can skip the trouble!
-
What kind of kennel management features does Pettle have?Lots! You can track pet check-ins and check-outs, log feeding and meds, assign pets to specific kennels or rooms, and even pull occupancy reports. It’s everything you need to keep things running smoothly, all in one place.
-
How can I upload Add-on Services?In addition to your core services, you can offer add-on services like pet taxis, extra meals, additional photographs, or anything else that enhances your offerings. Steps to Add an Add-on Service: Go to My Business > Add-on Services. Click on the "+" sign to create a new add-on service. Enter the name and description of the add-on. Select the Add-on Type: Flat-based (e.g., a pet grooming session for ₹500 per session). Distance-based (e.g., pet pickup and drop-off at ₹10 per km). 5. Set the amount for the service. 6. Choose the visibility: Public – Visible to clients. Private – Only for internal use. 7. Click Create, and your add-on service is ready!
-
When clients make a booking from the app, do they see a billing estimate?Yes! If enabled, your clients will be able to see the expected billing in the pet parent booking form. To enable this: 1️⃣ Go to My Business > Pet Parent App 2️⃣ Toggle "Is your billing public?" ON. This helps pet parents get a clear idea of costs before confirming their booking.
-
How do I send images to the pet parent via the app?To send images to a pet parent through the app, follow these steps: 1️⃣ Go to Booking Records. 2️⃣ Select the particular booking of the pet parent you want to send images to. 3️⃣ Open the Chat (In-App Messaging) section. 4️⃣ Upload and send the images directly. This ensures quick and seamless sharing of pet updates! 📸🐾🚀
-
Can the pet parent edit their pet's details?Yes! Pet parents can edit their pet's details via the Pettle pet parent app. However, the changes will only be updated after you review and accept the request, ensuring accurate records. 🐾✅
-
Should pet parents be able to see your profile on the portal and mobile app?Yes! Enabling this setting enhances the pet parent experience by allowing them to view your profile, manage bookings, and communicate seamlessly. To enable this: 1️⃣ Go to My Business > Pet Parent App 2️⃣ Toggle "Should pet parents be able to see your profile on the portal and mobile app?" ON. This makes interactions smoother and improves transparency with your clients.
-
Does Pettle have a pet parent app?Yes! We have a Pettle app for pet parents, available on both Android and iOS. It gets way better on the app! 😁 📲 Download the Pettle app to enjoy: ✅ Faster & easier appointment bookings ✅ Manage all your bookings in one place ✅ Update & maintain pet profiles ✅ Receive photo & video updates regularly ✅ Explore & book exciting pet events Get started today for a seamless pet care experience! 🚀
-
Can I get notifications on my mobile?Yes, you can! To enable push notifications, follow these simple steps: 1️⃣ Go to My Business 2️⃣ Select Push Notifications 3️⃣ Enable the notifications toggle Once enabled, you will receive important notifications directly on your mobile!
-
How can I download the host app on my mobile phone?Here are the steps for both Android and iPhone: For Android: 1️⃣ Go to https://pettleapp.com/login on Google Chrome 2️⃣ Tap the three-dot icon in the upper-right corner to open the menu 3️⃣ Select Add to the Home screen and press Add 4️⃣ The app will appear on your home screen or app drawer For iPhone: 1️⃣ Go to https://pettleapp.com/login on Safari 2️⃣ Tap the share button at the bottom 3️⃣ Select Add to Home screen and follow the instructions 4️⃣ The app will appear on your home screen That's it! Now you can access Pettle with ease.
-
How does the Pettle pet parent app make it easy for me?The Pettle pet parent app simplifies everything by allowing pet parents to: ✅ Make booking requests effortlessly 📸 Share & receive photos/videos of their pets 💳 Track & make payments seamlessly ⏰ View & send reminders for appointments 🐾 Edit & update pet profiles anytime This ensures a smooth and hassle-free experience for both pet parents and service providers! 🚀
-
Where can I find the GST report?To check your GST report, you can download the Invoice Report, which gives you a detailed view of your bookings and the revenue generated — all 📊 bifurcated by service categories. Here’s how you can access it: 1️⃣ Go to Reports > Revenue > Invoice Report 2️⃣ Select the desired 📅 date range and click Update 3️⃣ View the data right on your 📊 dashboard 4️⃣ Click on ⬇️ Download CSV to save the report This will provide all the necessary details for your GST calculations and reporting. ✅
-
What is the Reports section used for in Pettle?The Reports section in Pettle helps you track key business metrics, monitor performance, and analyze data for better decision-making. It is divided into three main tabs: 🔹 Revenue Reports ✅ Tracks total earnings over a selected date range. ✅ Helps monitor monthly revenue trends and business growth. ✅ Allows exporting data for financial analysis. 🔹 Bookings Reports ✅ Displays total number of bookings for different services (Boarding, Grooming, Training, etc.) ✅ Helps identify peak booking periods and trends. ✅ Useful for forecasting demand and planning resources. 🔹 Clients Reports ✅ Shows client details, including pet names, breeds, and booking history. ✅ Helps track new and returning customers. ✅ Allows exporting client data for marketing and retention strategies. With these reports, you can gain valuable insights into your business performance and customer trends. 🚀
-
How can I download a revenue report in Pettle?To download your revenue report in Excel format, follow these steps: 1️⃣ Go to Reports > Revenue. 2️⃣ Filter the report by selecting the desired date range (if needed). 3️⃣ Click on the Download option above the report. 4️⃣ The report will be downloaded in Excel format for further analysis. This allows you to keep records and track business performance easily. 🚀
-
Can I filter reports by date range?Yes! You can filter reports for a specific time period to analyze business performance. Steps to Filter Reports by Date Range: 1️⃣ Go to Reports. 2️⃣ Select the report type (Revenue). 3️⃣ At the bottom left, select the date range you want to view. 4️⃣ Click on the arrow icon, and the report will update based on the selected dates. This helps in tracking trends and comparing performance over different time periods. 🚀
-
What does the Client Database include?The Client Database is a comprehensive tool that keeps all essential client information organized and accessible. It includes: Pet Names and Parent Details: Easily identify pets and their owners. Contact Information: Quickly access phone numbers, email addresses, and other contact details. Pet Medical History: Complete vaccination records, deworming schedules, and health-related reminders to ensure pets stay healthy. Custom Tags for Categorization: Organize your clients by assigning custom tags (e.g., VIP clients, frequent visitors, etc.) Notes and Additional Details: Record any specific preferences, medical concerns, or unique client requirements for future reference. Key Sections: Basic Information: General client and pet details. Meal Preferences: Manage and track pet dietary needs. Vaccination: A log of vaccination dates and upcoming reminders. Medical Records: Track illnesses, treatments, and vet visits. Notes: Add any custom notes or observations. Bookings: A history of past and upcoming appointments or services. Subscriptions: Track active or past subscription plans. Additional Features: Assign Custom Tags: Create and assign tags to better organize and segment your clients. Edit and Archive Data: Easily update client information or archive inactive clients while preserving their records. Chat Directly in the App: Communicate seamlessly with clients through the app for quick updates or reminders.
-
How do I remove a client from my database?Instead of permanently deleting a client, we recommend archiving them. Archiving preserves all records for future reference, ensuring you can always retrieve important details if needed. Steps to archive a client: Go to the Client Database. Use the search bar to find the client you want to archive. Select the client and click on the three dots (options menu). Choose the "Archive" option. Select a reason for archiving the client. Click Done, and the client will be archived. Archived clients are no longer visible in the active database but can still be accessed in the archived records whenever needed. This keeps your database clean and organized without losing valuable information.
-
How can I add a second pet to an existing client?You can send a new onboarding link via Client Enquiry, asking the pet parent to fill out the form using the same mobile number. This will link the second pet to their existing profile. 🐾✅
-
Can I onboard a rejected client later?Yes! If you change your mind, go to the Rejected section in the Client Enquiry, search for the client, and click Onboard to proceed with their registration. 🚀
-
How does the Client Database benefit me?A well-organized client database ensures that you always have the information you need at your fingertips. This saves time, enhances efficiency, and improves your client relationships by making sure you never miss critical details. For Example: Let’s say a client calls you about their pet’s previous vaccination record. With the database, you can instantly pull up the information, saving you and the client valuable time. If a returning client books a service, you can quickly check the details of their past bookings, ensuring consistency and accuracy in your services. During peak seasons, you can effortlessly track and manage client enquiries, keeping your operations smooth and organised.
-
How do I change the pet details of an existing client?Follow these steps to update pet details: 1️⃣ Go to Client Database. 2️⃣ Select the client whose pet details you want to edit. 3️⃣ Click on the three dots (⋮) menu. 4️⃣ Select Edit and update the necessary details. 5️⃣ Click Save to apply the changes. This ensures accurate and up-to-date pet records! 🐾✅
-
How do I send the onboarding form to a client?To send the onboarding form, follow these steps: 1️⃣ Go to Client Enquiry. 2️⃣ Click on the "+" sign. 3️⃣ Enter the client's name and phone number. 4️⃣ Click on Send Onboarding Form PS- You can also add notes for your reference, this does not get shaed with the Pet parent. The form will be sent to the client via WhatsApp, allowing them to complete their onboarding seamlessly. 🚀
-
How do I reject a client enquiry if I decide not to onboard them?If a client has filled out the onboarding form but you decide not to proceed, follow these steps: 1️⃣ Go to Client Enquiry > Completed. 2️⃣ Select the client enquiry you want to review. 3️⃣ You will see two options: Onboard or Reject. 4️⃣ Click on Reject if you do not wish to proceed with this client. 5️⃣ Enter the reason for rejection (e.g., incomplete vaccinations, pet behavior issues, or service mismatch). (This reason is for your internal reference and will not be shared with the client.) 📌 Common Reasons for Rejection: Incomplete vaccinations (e.g., the pet hasn’t received required shots). Behavioral concerns (e.g., past aggressive incidents with staff or other pets). Mismatched services (e.g., the client is looking for a service you don’t provide).
-
How do I search for my client's data?Pettle makes searching simple and intuitive. You can look up clients using details like the pet's name, pet parent's name, or phone number.
-
How can I edit pet details after the client is onboarded?You can update a pet’s details, including behaviour and other information, even after onboarding. Steps to edir pet details: 1️⃣ Go to Client Database. 2️⃣ Search for and select the client. 3️⃣ Click on the three dots (⋮) beside the Chat-in-App option. 4️⃣ Select Edit. 5️⃣ Update the necessary pet details or behaviours. 6️⃣ Click Update to save the changes. This ensures that pet records stay accurate and up to date. 🚀
-
Can I add a client without filling out the form?Yes, you can! Simply go to the Client Database and click on the "+" sign to create a new client. Fill in only the essential details. This is perfect for walk-in clients or when a client is hesitant to fill out the form. The pet parent can complete the profile later on the pet parent app.
-
Steps to Register a New ClientGo to the Dashboard and navigate to Client Enquiries. Click on the "+" icon, and you will see the "Add Enquiry" card. Input the client's name and phone number. Click on Send Onboarding Form. A form link will be sent to the client via WhatsApp. The client can then fill out the form and request onboarding. Once the client completes the form: Go to Client Enquiries > Pending Tab. Select the desired client from the list. You will have the option to Accept or Reject the request based on the details provided.
-
How do I register new customers?The process depends on how you're currently managing your customer registrations: If you use pen and paper, this is a great opportunity to digitalize your process. Pettle allows you to streamline customer registrations, reduce manual errors, and keep all client data organized in one place, accessible anytime. If you use another medium or software, we’ll help you transition seamlessly to Pettle. Our tool is designed to fit into your workflow, not the other way around. You’ll find that Pettle enhances your process by making it faster, easier, and more efficient.
-
Are the notes shared with the clients?No, client notes are private and meant solely for your internal use. This ensures that you can document important information without sharing it with your clients.
-
But this form is too longNo worries! The form is fully customizable. You can shorten it by hiding questions or setting fields as optional or mandatory based on your preferences. This way, you can keep it as concise or detailed as you like.
-
Can I reinstate a rejected booking request?No, a rejected booking request cannot be reinstated. You will need to create a new booking request if required.
-
How can I mark an invoice as paid?To mark an invoice as paid: 1️⃣ Go to Invoices in your Pettle Dashboard. 2️⃣ Find the invoice with Unpaid payment status. 3️⃣ Click on View to open the invoice details. 4️⃣ Go to the Payments section and pay the due amount. Once the payment is made, the invoice status will be updated to Paid.
-
How can I check the payment status of an invoice?To check the payment status of an invoice: 1️⃣ Go to Invoices 2️⃣ Check the Payment Status Tab, where you will see one of the following statuses: No Bill: No invoice has been generated yet. Unpaid: The full amount of the invoice is still pending. Partially Paid: A portion of the invoice has been paid, but there’s an outstanding balance. Paid: The invoice has been fully paid. Overpaid: The amount paid exceeds the total billing amount, creating a credit.
-
How can I update or edit an invoice if an error or update is required?To update or edit an invoice: 1️⃣ Go to Invoices in your Pettle Dashboard. 2️⃣ Check for invoices you want to edit. 3️⃣ Click on View to open the invoice details. 4️⃣ Go to the Billing section and click the three dots (⋮). 5️⃣ Select Edit Invoice. 6️⃣Make the necessary changes and click Update to save. 🔹 Editable Sections in an Invoice: ✅ Base Price – Modify the base cost of the service or product. ✅ Add-ons – Add or remove additional services/products. ✅ Additional Charges – Apply extra costs for special requests or adjustments. ✅ Additional Discounts – Offer customised discounts on the total invoice amount. 🔹 Applying Discounts to Individual Items: You can also apply a discount on each line item instead of the total invoice. Simply click on the discount field next to the item and enter the discount amount or percentage. 🔹 Editing Auto-Calculated Items: Pettle also allows you to edit auto-calculated fields on invoices (such as base charges). To enable this feature, please contact your Pettle POC for assistance.
-
Can I view invoices from a particular date range?Yes, you can filter invoices by date range. Here’s how to do it: 1️⃣ Go to Invoices in your Pettle Dashboard. 2️⃣ Click on the filter icon. 3️⃣ Select the date range you want (e.g., last week, last month, custom range). 4️⃣ Click on Apply to view invoices within the selected date range.
-
Can I download or print an invoice from Pettle?Yes, you can easily download or print an invoice. Here are the steps: 1️⃣ Go to Invoices in your Pettle Dashboard. 2️⃣ Select the invoice you want to download or print. 3️⃣ Click on View to open the invoice details. 4️⃣ In the View Invoice page, you will see options to Download or Print the invoice.
-
How can I view the list of all my invoices in Pettle?You can view all your invoices in two ways: 1️⃣ From Individual Bookings – Access invoices directly within each booking. 2️⃣ From the Invoices Section – Log in to the Pettle Dashboard, and click on "Invoices" in the left-hand menu to see a complete list of all invoices. This allows you to track and manage all invoices in one place.
-
What invoice details can I see in Pettle?In Pettle, you can view comprehensive invoice details, including: Invoice Number: Unique identifier for each invoice. Invoice Type: Type of invoice (e.g., sale, booking, subscription). Client Name: The name of the client for whom the invoice was generated. Invoice Date: The date the invoice was issued. Total Billing Amount: The full amount billed for services or products. Paid Amount: The amount that has already been paid towards the invoice. Payment Status: The current status of the payment (e.g., paid, pending, or overdue).
-
How can I share the invoice with my client?The easiest way to share the invoice is through the Pet Parent App, where clients can access it directly. Additionally, you can include the invoice link and send it to your client via WhatsApp.
-
How do I filter or sort invoices?To filter or sort invoices: 1️⃣ Go to Invoices in your Pettle Dashboard. 2️⃣ Click on the filter icon. 3️⃣ Choose to filter by booking payment status (e.g., Paid, Unpaid) or by date range (e.g., this month, last month). This helps you view specific invoices based on payment status or periods.
-
How do I edit the invoice/bill?To edit the invoice or bill: 1️⃣ Go to Booking Records and select the relevant booking. 2️⃣ Click on Billing. 3️⃣ Click on the three dots (⋮) in the top-right corner. 4️⃣ Select Edit to make changes. 5️⃣ You can then: Edit the Base Charges (e.g., add discounts or modify the cost). Add Add-Ons for additional services. Apply Additional Charges (e.g., taxes, late fees). Add Additional Discounts (both flat and percentage). Once the changes are made, click Save, and your updated invoice will be reflected. 🚀
-
What are daily tasks?Daily tasks help you keep track of routine activities, appointments, and pending actions related to active and upcoming bookings for the day (specifically for boarding services). You can view and manage all bookings from one central location, eliminating the need to navigate between different tabs. This ensures smooth operations and better time management for your daily activities.
-
How do I share my Daily Tasks with my team?To share your Daily Tasks with your team, follow these steps: 1️⃣ Go to Daily Tasks. 2️⃣ Filter the columns based on your requirements (e.g., Booking, Client, Meals, etc.). 3️⃣ Click on Download. 4️⃣ Choose your preferred format (either Excel Sheet or PDF). 5️⃣ Download the report and share it with your team. This allows you to easily provide your team with the relevant task details in a convenient format. 🔹 Even better! A simpler way to share Daily Tasks is through Access Management. You can create a custom role for your staff, granting them direct access to manage Daily Tasks in real-time—no need to download and share reports manually! 🚀
-
What does the Daily Tasks list show me?The Daily Tasks list in Pettle helps you manage and track all essential details for each boarding booking. Here’s a breakdown of what each filter shows: 1. Booking Redirects to View Booking & Manage Booking: Clicking on this takes you to the detailed booking page where you can view the full booking details and make any necessary updates or changes. 2. Client Shows the pet parent’s details like their name, contact information, and any relevant communication notes related to the booking. 3. Meal 1, Meal 2, Meal 3, Meal 4 Tracks the meals provided for the pet, including the meal types and feeding schedules (e.g., breakfast, lunch, and dinner). This helps ensure that each pet receives their appropriate meals at the right times. 4. Additional Meals Displays any additional meals requested by the pet parent during the stay (e.g., extra snacks, special diet meals). 5. Medicine Schedule Keeps a record of any medications that need to be administered to the pet during their stay, including dosage, frequency, and time of administration. 6. Preferences or Allergies Lists any special preferences or known allergies of the pet, such as preferred food, comfort items, or sensitivity to certain ingredients. 7. Services Booked Shows the additional services booked by the pet parent (e.g., grooming, training, playtime). This allows staff to keep track of services that need to be delivered throughout the pet's stay. 8. Payment Received Displays the payment status of the booking (e.g., paid, pending, or partially paid). Helps track any outstanding payments and ensures smooth billing. 9. Final Billing Amount Shows the final amount to be charged at the end of the pet's stay, including any adjustments for additional meals, services, or changes in the booking.
-
Can I customise the Daily Task view?Yes, you can customise the Daily Task view by filtering the data based on the available options. You can click on Columns in the top right corner to select or unselect the following options to show only the relevant details for your tasks: Booking Client Meals Additional Meals Medicine Schedule Preferences or Allergies Services Booked Payment Received Final Billing Amount This allows you to focus on specific aspects of your daily tasks without unnecessary information cluttering the view.
-
Can I view bookings in the calendar based on different services (e.g., Boarding, Grooming, Dog Walking)?Yes! You can filter bookings by specific services in the calendar. Steps to View Bookings by Service: 1️⃣ Go to Calendar. 2️⃣ Click on Summary. 3️⃣ Select the booking type (e.g., Boarding, Grooming, Dog Walking). 4️⃣ The calendar will update to show only bookings for the selected service. This makes it easy to manage and track different services efficiently. 🚀
-
Can I see past and upcoming bookings in the Calendar?Yes! You can view both past and upcoming bookings in the calendar. Steps to Check Past & Upcoming Bookings: 1️⃣ Go to Calendar. 2️⃣ Click on Summary View. 3️⃣ Select the booking type (e.g., Boarding, Grooming, Dog Walking). 4️⃣ Choose the month (past or future) to view bookings. 5️⃣ The calendar will display booked services for the selected dates. This helps in tracking previous appointments and planning ahead for upcoming bookings. 🚀
-
What is the Calendar tab used for in Pettle?The Calendar tab in Pettle helps you manage all your bookings and schedules in one place. It provides two views—Summary and Timeline—to track different services and appointments efficiently. 🔹 Summary View ✅ Gives a quick overview of upcoming and past bookings. ✅ Displays the total number of Check-ins, Check-outs, and Active Bookings for each day. ✅ Helps in monitoring daily occupancy and managing schedules at a glance. 🔹 Timeline View ✅ Provides a detailed, hour-by-hour breakdown of bookings. ✅ Shows specific services like Boarding, Grooming, Dog Walking, and Training. ✅ Helps in staff planning and managing overlapping appointments. With the Calendar tab, you can easily track, modify, and plan all pet bookings, ensuring smooth business operations. 🚀
-
What are the different Calendar views?Pettle offers two Calendar views to help manage bookings efficiently. 🔹 Summary View ✅ Provides a quick daily overview of bookings. ✅ Displays Check-ins, Check-outs, and Active Bookings for each date. ✅ Helps in monitoring overall occupancy and planning schedules. 🔹 Timeline View (Available only on Desktop) ✅ Shows a detailed, hour-by-hour breakdown of bookings. ✅ Allows you to track specific services like Boarding, Grooming, Dog Walking, and Training. ✅ Useful for managing overlapping bookings and staff scheduling. Both views help in organizing and streamlining operations based on booking type and availability. 🚀
-
How do I check availability for a specific date?AnswerTo check availability for a particular date, follow these steps: 1️⃣ Go to Calendar. 2️⃣ Switch to Timeline View. 3️⃣ Navigate to the specific month and date you want to check. 4️⃣ You will see a detailed breakdown of bookings, available slots, and occupied spaces for that day. This helps in quickly identifying open slots for new bookings. 🚀
-
What kind of roles and permissions can we add?Pettle allows you to create various roles with specific permissions based on responsibilities. Below is an indicative list, but you can create even more custom role combinations to fit your business needs: 1. Admin – Full access to all features, including user management, settings, reports, and all client data. 2. Manager – Oversees bookings, staff, and daily operations but doesn’t have full control over system settings. 3. Staff Role – Handles routine tasks like managing appointments and interacting with clients, with limited access to core settings. 4. Bookings Management – Manages client bookings, schedules, and appointments, but has no access to administrative settings. 5. Daily Tasks – Focuses on managing daily schedules, assigning tasks to staff, and ensuring smooth operations. 6. Van Groomer – Manages mobile grooming services, handling appointments and schedules for grooming outside the facility. 7. Receptionist – Handles client check-ins, schedules appointments, and provides general customer service at the front desk. 8. Junior Trainer – Assists with training sessions, manages training schedules, and supports senior trainers with pet training. 9. Groomer – Manages and performs grooming services, including handling appointments, pet grooming details, and communication with clients.
-
What is Access Management?Access Management in Pettle enables admins to assign specific roles and permissions to users, ensuring that the right people have access to the right features within the system. For example, an Admin has full access, while a Groomer or Receptionist might have limited permissions to manage bookings, client interactions, or daily tasks. Defining roles such as Groomer, Junior Trainer, etc allows businesses to maintain security, optimise workflows, and ensure each user has the appropriate level of access to complete their tasks efficiently. This feature is crucial for managing different levels of responsibility and control within the platform. Additional charges may get applied.*
-
How can I manage access control for my staff in Pettle?In Pettle, you can give controlled access to your staff. Do reach out to your Pettle PoC if it is not activated for your account yet. You can manage the access by following the steps below: 1️⃣ Go to My Business > Access Management > Roles. 2️⃣ Create a new role.Assign or modify permissions for different entities (e.g., Clients, Bookings, Grooming, Payments, Inventory). 3️⃣Save the changes, and any user with this role will have the updated permissions. 💡Once roles are configured, you can then assign these roles to specific users under the user tab. This ensures that each team member has the right level of access, keeping operations secure and streamlined. You can always edit the access given to any user.🚀
-
How can I assign roles and permissions to users?To assign roles and permissions to users in Pettle, follow these steps: 1️⃣ Go to My Business > Access Management > Users. 2️⃣ Choose an existing role (e.g., Admin, Manager, Staff) or click to create a new role. 3️⃣ For each role, you can define specific permissions for actions like managing bookings, client data, or daily tasks. 4️⃣ Assign the appropriate role to each user based on their responsibilities within your business.
-
What is the "Transfer" option in SKU?The "Transfer" option allows you to move stock from one outlet or location to another while keeping your inventory records updated. 📌 Example Scenarios for Transfers: Moving pet food or supplies from one branch to another. Transferring stock between warehouses for better distribution. Shifting low-selling products to a location with higher demand. This ensures that inventory levels remain accurate across multiple locations. 🚀
-
Can I create a separate invoice for my sale at the retail shop?Yes! You can generate a separate invoice for retail sales. Steps to Create & Download a Retail Sale Invoice: 1️⃣ Follow the same steps to record a sale in Inventory > Sale. 2️⃣ Once the sale is recorded, go to the specific sale entry. 3️⃣ Click on the three dots (⋮) next to the sale. 4️⃣ Select View Invoice. 5️⃣ You can now download, share, or print the invoice as needed. This ensures proper billing and record-keeping for retail transactions. 🚀
-
How do I create a new purchase order?To create a new purchase order in Pettle, follow these steps: 1️⃣ Go to Inventory > Purchase Order. 2️⃣ Click on the "+" sign to create a new order. 3️⃣ Select the vendor from whom you are purchasing. 4️⃣ Upload the invoice (if available). 5️⃣ Click Create, and your purchase order will be saved.
-
How do I record a sale in the Inventory tab?To record a sale and generate an invoice, follow these steps: 1️⃣ Go to Inventory > Sale. 2️⃣ Click on the "+" sign to create a new sale. 3️⃣ Select the client making the purchase. 4️⃣ Choose the invoice date. 5️⃣ Click on "+" to add items from your inventory. 6️⃣ Enter the quantity, price, and applicable tax. 7️⃣ Click Add, and the sale will be recorded. This ensures that stock levels are updated and transactions are properly documented. 🚀
-
Where can I view all my retail vendors in Pettle?You can view and manage all your retail vendors in Pettle’s Inventory section. Steps to View Vendors: 1️⃣ Go to Inventory. 2️⃣ Click on Vendors to see the complete list of your suppliers. This helps in tracking vendor details, managing supplier relationships, and streamlining purchases. 🚀
-
Can I track past purchase orders in Pettle?Yes! You can track all your past purchase orders along with their statuses. Steps to View Past Purchase Orders: 1️⃣ Go to Inventory > Purchase Order. 2️⃣ You will see a list of all past purchase orders. 3️⃣ Each order will be marked with a status: Received ✅ – Order successfully completed and stock updated. Cancelled ❌ – Order was not processed. Open ⏳ – Order is still pending or in progress. This helps in tracking vendor transactions and managing stock efficiently. 🚀
-
How can I update the stock quantity after receiving a new purchase order?✅ If using the Purchase Order feature – The inventory automatically updates when you accept the purchase order. ✅ If updating manually – Follow these steps: 1️⃣ Go to Inventory > SKU. 2️⃣ Search for the item you want to update. 3️⃣ Click on the "+" sign next to the item. 4️⃣ Enter the new quantity and cost price. 5️⃣ Click Update, and the stock will be adjusted. This ensures your inventory remains accurate and up to date. 🚀
-
How do I add or update an SKU for a product?To add or update an SKU in your inventory, follow these steps: To Add a New SKU: 1️⃣ Go to Inventory > SKU. 2️⃣ Click on the "+" sign to add a new SKU. 3️⃣ Enter all the required details: Product Name – The name of the item as listed in the inventory. Company Name – The manufacturer or supplier of the product. SKU ID – A unique identifier assigned to track the item in your inventory system. Barcode – A scannable code that quickly retrieves product details. HSN Code – A classification code used for taxation and GST compliance. Tax Details – Information on applicable taxes like GST, VAT, or other levies based on product type and location. 4️⃣ Click Create to save the SKU. To Update an Existing SKU: 1️⃣ Go to Inventory > SKU. 2️⃣ Search for and select the SKU you want to update. 3️⃣ Click Edit, modify the necessary details, and save changes. This ensures accurate tracking and management of stock items. 🚀
-
Will writing off an item automatically adjust my stock count?Yes! When you write off an item, the system will automatically update the stock count, ensuring accurate inventory records. This helps in keeping track of damaged, expired, or unsellable items without manual adjustments. 🚀
-
Does the stock update automatically when a sale is made?Yes! When a sale is recorded in Pettle, the stock quantity automatically updates, ensuring accurate inventory management. 🚀
-
How can I search for an item in my inventory?To quickly find an item in your inventory, follow these steps: 1️⃣ Go to Inventory > SKU. 2️⃣ Use the search bar to look up items by name, SKU, or details. 3️⃣ Alternatively, use a barcode scanner to instantly pull up the item. 4️⃣ The matching inventory items will be displayed for easy access and updates. This ensures efficient stock management and tracking. 🚀
-
How can I check the stock level of an item?To check the stock level of an item in Pettle, follow these steps: 1️⃣ Go to Inventory > SKU. 2️⃣ You will see a list of all items with their current stock quantity. 3️⃣ Use the search bar to find a specific SKU. 4️⃣ Click on the item, and the quantity will be displayed in the Info tab. This helps in tracking inventory levels and ensuring stock availability. 🚀
-
Can I link multiple vendors to the same product?Yes, you can link multiple vendors for the same product. When you are creating a vendor, you can list the products associated witht them. Additionally, you can add more products to the existing vendors as well.
-
Can I create a combined bill for service and inventory sale?Yes! You can add inventory sales to a service invoice to generate a single combined bill. Steps to Create a Combined Invoice: 1️⃣ Go to Booking Records. 2️⃣ Select the booking for which you want to add an inventory sale. 3️⃣ Navigate to the Sale tab. 4️⃣ Click on the "+" sign to add an item. 5️⃣ Enter the item name, quantity, and price. 6️⃣ Click Add, and the combined invoice will be generated. This ensures that both services and retail purchases are billed together for a seamless customer experience. 🚀
-
How do I add a new vendor for my retail?To add a new vendor, follow these steps: 1️⃣ Go to Inventory > Vendors. 2️⃣ Click on the "+" sign to add a new vendor. 3️⃣ Enter the required details: Vendor Name Company Name Phone Number Email Address Products Sourced (Specify the items you procure from this vendor, such as pet food, grooming supplies, or accessories) 4️⃣ Click Save, and the vendor will be added to your records. This ensures seamless vendor management and inventory tracking. 🚀
-
How do I manage my Inventory in Pettle?The Inventory section in Pettle helps you efficiently manage your retail shop and stock levels. Steps to Manage Inventory: 1️⃣ Go to Dashboard > Click on Inventory. 2️⃣ You will find the following key options: SKU – Track products using unique codes. Vendor – Manage suppliers and vendor details. Purchase Order – Record and track inventory purchases. Sale – Used to sell inventory items and generate invoices directly, typically for retail products. You can also search for items by name, SKU, or other details to quickly find and update stock. 🚀 Additional charges may get applied.*
-
How do I write off damaged or expired stock in Pettle?You can write off stock when items are damaged, expired, or unsellable to ensure accurate inventory records. Steps to Write Off Stock: 1️⃣ Go to Inventory > SKU. 2️⃣ Select the item you want to write off. 3️⃣ Click on the three dots (⋮) next to the item. 4️⃣ Choose Write Off. 5️⃣ Enter the quantity to be written off and the reason (e.g., expired product, damaged packaging, spoilage). 6️⃣ Click Confirm, and the stock will be updated. 📌 Example Scenarios for Write-Offs: Expired pet food or medicines that can no longer be sold. Damaged stock due to mishandling or poor storage. Defective products received from the supplier. Mismatch in tallying count during inventory audits. This helps in maintaining accurate inventory levels and avoiding discrepancies in stock. 🚀
-
How do I delete or archive an item from my inventory?Deleting inventory items is not enabled, as it could impact past billings and sales records. However, you can archive an item instead. 📌 To archive an item:Please contact your Pettle POC, and we’ll get it done ASAP! 🚀 Our team will guide you on the best approach to ensure smooth inventory management.
-
What is Client Tagging?Client tagging is a powerful feature that allows you to categorize your clients into different groups based on their needs, behaviours, or characteristics. By assigning tags, you can organize your database effectively and focus your energy on the clients that matter most to your business. Examples of How Client Tagging Can Help: Prioritize Key Clients: Create tags like "Big Spender" for clients who spend a lot. This helps you identify and give extra attention to your most valuable customers. Filter Out Unnecessary Clients: Use tags like "Blocked" or "Blacklisted" for clients you no longer wish to engage with. This keeps your database clean and focused. Categorize Client Types: "Multi-Pet Parents": Easily identify clients who own multiple pets. "New Clients": Track and nurture recent sign-ups or new customers. Using client tags strategically lets you quickly filter and identify specific groups, focus your efforts on high-value clients, and streamline your workflows. It's an easy and effective way to manage your customer relationships! Additional charges may get applied.*
-
How can I give discounts to regular clients?AnswerYou can offer discounts to regular clients by: 1️⃣ Using Client Tagging – Tag them as regular clients in the system. 2️⃣ Assigning Discounts via Service Catalog – Set special pricing or discounts for tagged clients. This ensures a seamless and automated discount process for your loyal customers! 🚀
-
How do I create and assign client tags?Creating a Client Tag: 1️⃣ Go to My Business > Client Tagging. 2️⃣ Click on the "+" sign to add a new tag. 3️⃣ Enter the Category Title and Description. 4️⃣ Choose a Color Code for easy identification. 5️⃣ Click Create, and the tag will be added. Assigning a Tag to a Client: 1️⃣ Go to Client Database. 2️⃣ Select the client you want to tag. 3️⃣ Click on the three dots (⋮). 4️⃣ Choose Update Client Tag. 5️⃣ Select the tag(s) from the dropdown list. 6️⃣ Click Update Client Tag, and the tag will be assigned. This helps in categorizing clients for better segmentation and service personalization. 🚀
-
How long does it take to process the WhatsApp integration?The WhatsApp integration process takes up to 2 weeks to complete.
-
Will I be able to see all my WhatsApp messages on the Pettle app?Yes! You will have a dedicated dashboard displaying all your WhatsApp messages. You can also grant access to your team if required, ensuring smooth communication and collaboration. 🚀
-
Will I be able to send marketing messages?Yes! You can send both individual marketing messages (e.g., birthday wishes) and group marketing messages (e.g., festival offers). 📌 You'll have access to a template dashboard where you can create and manage different templates for marketing and utility messages, ensuring smooth and effective communication. 🚀
-
How can I send WhatsApp messages automatically?Pettle offers WhatsApp Business integration, allowing you to send messages automatically. With a dedicated and verified number, you can: ✅ Send images, videos, PDFs, and links ✅ Enable bulk messaging for announcements and promotions To start your WhatsApp Business integration, reach out to us. Additional charges apply*. 🚀
-
What is the Geolocation feature on Pettle?The Geolocation feature allows pet parents to add their pinned location in the app. This is especially useful for: 📍 Groomers offering home grooming services 🚖 Boarding businesses providing pickup and drop services It ensures accurate location tracking and smoother service coordination. 🚀 Additional charges may get applied.*
-
Where do I see this pinned location?You can access the pinned location in the Client Database. Clicking on it will redirect you to Google Maps, allowing for easy navigation and service coordination. 🚀
-
Can I create my own custom expense categories?Yes! You can create custom expense categories to better organize your business expenses. Steps to Add a Custom Expense Category: 1️⃣ Go to Expenses. 2️⃣ Click on the Settings icon. 3️⃣ Click on "Add New Category" in the top right corner. 4️⃣ Enter the Category Name and Description. 5️⃣ Click Add, and the new category will be created. This helps in categorizing expenses based on your business needs for better financial tracking. 🚀
-
Can I export my expense report?Currently, expense export is not available directly in the system. However, we’re happy to assist you! 📌 To get your expense report, contact your Pettle POC, and we will provide the details as needed.
-
How do I add a new expense in Pettle?To record a new expense in Pettle, follow these steps: 1️⃣ Go to Expenses. 2️⃣ Click on "+ Add". 3️⃣ Enter the Expense Name and Date. 4️⃣ Input the Amount. 5️⃣ Select the Expense Category (e.g., Rent, Salaries, Supplies). 6️⃣ Choose the Payment Mode (Cash, Card, Bank Transfer, etc.). 7️⃣ Click Add, and the expense will be recorded. This helps in tracking all business expenses efficiently in one place. 🚀
-
Is there a way to track total spending for a specific period?Currently, tracking total expenses for a specific period is not available within the system. However, we are working on this feature! 📌 In the meantime, please contact your Pettle POC, and we will assist you with the details.
-
Can I add a photo of the invoice/bill for the expense?Yes! While adding an expense, you have the option to upload the receipt or invoice for better record-keeping. Steps to Upload an Invoice/Bill: 1️⃣ Go to Expenses > Click on "+ Add". 2️⃣ Fill in the expense details (Name, Amount, Date, Category, etc.). 3️⃣ Click on the Upload Receipt option. 4️⃣ Select and upload the invoice/bill image. 5️⃣ Click Add, and your expense will be saved with the attached receipt. This helps in maintaining clear records for future reference. 🚀
-
Can I edit or delete an existing expense?Currently, you can only delete an expense from your Expenses tab. Steps to Delete an Expense: 1️⃣ Go to Expenses. 2️⃣ Find the expense you want to delete. 3️⃣ Click on the delete icon on the right-hand side. 4️⃣ The expense will be permanently deleted. 🚨 Note: Editing an expense is not available at the moment. If changes are needed, you will have to delete the expense and re-add it with the correct details. 🚀
-
How do I manage my expenses on Pettle?Pettle allows you to track and organize all your business expenses in one place. Steps to Manage Expenses: 1️⃣ Go to the Expenses tab on the left-hand menu. 2️⃣ View and manage all recorded expenses. 3️⃣ Add different categories (e.g., Rent, Salaries, Supplies) to classify expenses. 4️⃣ Enter new expenses as they occur to keep records up to date. This helps in budgeting, financial tracking, and efficient business management. 🚀 Additional charges may get applied.*
-
Is the Payment Gateway included in my Pettle subscription?The Payment Gateway is included as part of the Elite Plan. For users on the Core and Smart plans, the Payment Gateway can be added for an additional charge.
-
Which payment gateway does Pettle support, and can I integrate my own?Pettle supports Razorpay as its default payment gateway, ensuring seamless and secure payment processing. If you have specific payment gateway requirements, please contact your Pettle POC for more information on possible integrations. 🚀
-
How do I check if the Payment Gateway is enabled?To check if the Payment Gateway is enabled: 1️⃣ Go to My Business > Payment Gateways. 2️⃣ Check if the toggle for Payment Gateway is turned on. If the toggle is enabled, the Payment Gateway is active and ready to use.
-
Does the Payment Gateway take a percentage of the transaction?Yes, Razorpay charges an average 2.6% transaction fee on all payments processed through the gateway.
-
Can I change the advance payment percentage?Yes! To set or modify the advance payment percentage: 1️⃣ Go to My Business > Payment Gateways. 2️⃣ Set the Percentage (%) of the booking amount to be collected as advance payment. 3️⃣ Click Update to save the changes.
-
Can pet parents pay in advance for booking requests?Yes! You can enable advance payments by turning on the Booking Request Payment toggle. Once enabled, pet parents will have the option to pay in advance while making a booking request.
-
Where do I check the service counts left in a subscription?You can check the remaining service count in two ways: Method 1: Through Subscription Tab 1️⃣ Go to Subscription > Issued. 2️⃣ Select the client. 3️⃣ Navigate to the Booking section. 4️⃣ Check the remaining service count. Method 2: Through Client Database 1️⃣ Go to Client Database. 2️⃣ Search for and select the client. 3️⃣ Click on the Subscription tab. 4️⃣ View the remaining service count.
-
What is Subscription Packages?Subscription Packages in Pettle allow you to bundle services for clients, offering them single or multi-service packages at a fixed price. 📌 Key Benefits:✅ Clients can prepay for multiple sessions (e.g., 5 Grooming sessions, 10 Dog Walks).✅ Helps in customer retention by encouraging repeat bookings.✅ Improves your cash flow by ensuring upfront payments. 🚀 You can customize packages based on your business model and client needs. 🚀 Additional charges may get applied.*
-
How do I create a Subscription Package?To create a subscription package in Pettle, follow these steps: 1️⃣ Go to Subscription > Package. 2️⃣ Click on the "+" sign to create a new package. 3️⃣ Enter the Package Name and Description. 4️⃣ Set the Validity Period (e.g., 1 month, 3 months). 5️⃣ Add the Price, Discounts, and Tax details. 6️⃣ Click Save, and the package will be available for use.
-
How do I send the subscription invoice?To download and share the subscription invoice, follow these steps: 1️⃣ Go to Subscription > Issued. 2️⃣ Select the client whose invoice you want to send. 3️⃣ Navigate to the Billing section. 4️⃣ Click on the three dots (⋮) next to the invoice. 5️⃣ Select Invoice > Download or Print. 6️⃣ Share the invoice with the client via WhatsApp, email, or print copy. This ensures the client receives a clear record of their subscription purchase. 🚀
-
How do I manage payments for the subscription?To add or update payments for a subscription, follow these steps: 1️⃣ Go to Subscription > Issued. 2️⃣ Select the client whose subscription payment you want to manage. 3️⃣ Click on the Payments tab. 4️⃣ Click on the "+" sign to add a payment. 5️⃣ Enter the payment details (amount, mode of payment, etc.). 6️⃣ Click Save, and the payment will be recorded. This ensures that all subscription payments are properly tracked and updated. 🚀
-
How do I assign a Subscription Package?To assign a subscription package to a client, follow these steps: 1️⃣ Go to Subscription > Issued. 2️⃣ Click on the "+" sign to add a new subscription. 3️⃣ Search and select the client. 4️⃣ Enter the Invoice Date and Start Date. 5️⃣ Select the Package from the list. 6️⃣ Click Create, and the subscription will be assigned to the client. This ensures clients can start using their package immediately. 🚀
NAVIGATE
© 2025 Pettle Pet Services Pvt. Ltd. All rights reserved.
B3/1003, RUNWAL ESTATE, Thane West, Maharashtra 400607
NAVIGATE
© 2025 Pettle Pet Services Pvt. Ltd. All rights reserved.
B3/1003, RUNWAL ESTATE, Thane West, Maharashtra 400607
NAVIGATE
© 2025 Pettle Pet Services Pvt. Ltd. All rights reserved.
B3/1003, RUNWAL ESTATE, Thane West, Maharashtra 400607
bottom of page